How to Create a Task
There are two main ways you can create tasks
1) Using the “Add a Task” feature at the right of each screen.
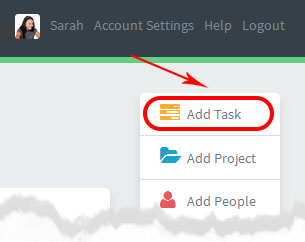
2) Or by using the “Add Task” function – which is on the far right of each Task List header bar

Either of these will bring up the “Create New Task” dialog box.
Creating a Task – Details
Adding Text
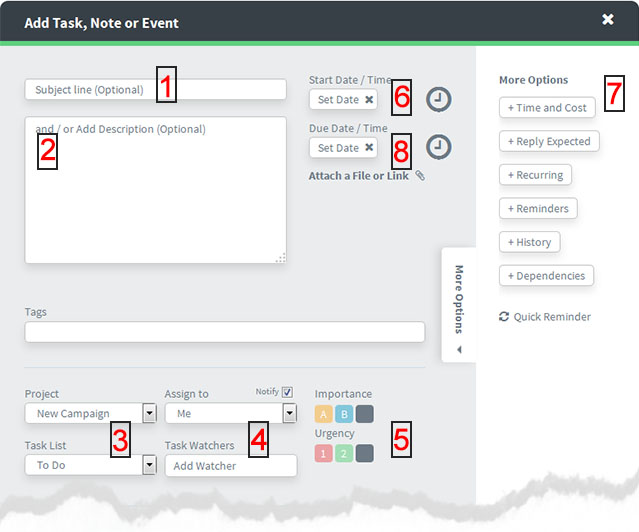
You can write into the subject line (See 1) OR the text dialog box (See 2) – into which you can type in – or paste – as much text as you like.
Assigning to Projects and People
You nominate the project and task list you want the task to belong to. (See 3)
Assign the task to someone (See 4). This means they get an email notification plus an automated reminder if the task goes overdue – you can add a new person to the project as you create the task.
You can also make people “Task Watchers”. This means they can see its progress. They get copied on any comments and notifications about the task. See more about Task Watchers
Priorities
Set a priority level (See 5).
*You can read more about task priority levels – here
Setting Start and Due Dates
Give it a Start Date and / or a Due date and time (See 6 above).
Read more about Start and Due dates here
Plus “More Options”
There are various useful extra features (see 7)
Note you can set this More Options window to be closed by default in your Account Settings.
Attaching Files
You can attach a file to the task – this is automatically stored in the Project Files section, but also remains attached to the task. (See 8 above)
The assigned and any “Task Watchers” will get a copy of the file in their email notification.
Creating tasks by email
Please note you can also Create tasks by email (read on)
Changing the Size of Tasks
Task are in a modal resizable window.
Use the expand feature at the bottom right of the task to make it bigger. – * see below*

Read more about Dooster Tasks
Questions?
 Visit our FORUM